Facebook is still in the lead of ad channels for both. The high quality of this ad channel makes it a perfect traffic source for A/B tests. The Facebook Pixel is an analytics tool that helps you evaluate the efficiency of Facebook Ads campaigns. It gives you an understanding of how users interact with your ads making conversion tracking, optimization, and remarketing way easier.
If you run A/B experiments with SplitMetrics and integrate them with the Facebook Pixel, you can get even more insights into users’ behavior on product pages and advance the efficiency of your marketing activity.
The creation of the Facebook Pixel and its integration with SplitMetrics is a matter of minutes. Here is a step-by-step guide to creating the Facebook Pixel.
2. Press Add button.
If you have never created a FB Pixel before, the screen will look like this
If you have already created a FB Pixel for your regular ad campaigns before, the window to create a separate Pixel for SplitMetrics tests will look like this
3. Give a name to your Pixel
4. Select Set up the Pixel Now
5. Press Manually add pixel code to website
6. Click on selected area Copy Code to Clipboard, Turn off Automatic Advanced Matching and press Continue button
7. Cancel step Set Up Events
8. On the right side press the button Add Assets and share Pixel at your Ad account
9. Click on Pixel ID for a copy to clipboard
To finish FB Pixel setup move to paragraph 17.
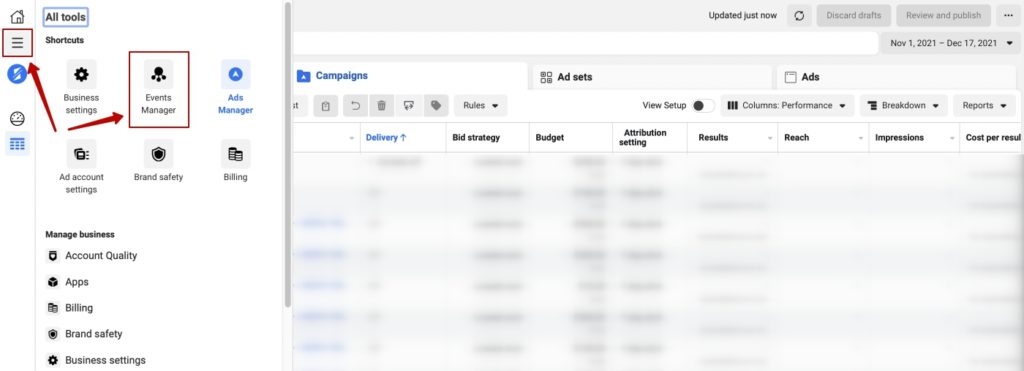
10. Go to Events Manager in Ad account (in the top right corner, select the correct Ad account)
Or log in to your Ad account in the Events Manager section

11. Click on “Connect Data Sources”
12. Select Web and press Connect
13. Select Facebook Pixel and click Connect
14. Click Continue
15. Give your Pixel a name.
Copy the URL provided on your SplitMetrics campaign page. Enter your traffic link with a custom domain https://*****.app/****/**** URL
After this window above you will see an additional window – you can close it because it is optional.
16. Cope the Pixel ID of the Pixel you have created
17. On the SplitMetrics experiment dashboard, on the Integration section – Facebook Pixel insert the copied FB Pixel ID and Enable Integration
18. Before you start an ad campaign, you need to trigger the Pixel.
To do this, follow the traffic link (via Chrome browser or mobile, doesn’t matter) and manually click on the GET (Install) button.
You’re done, now SplitMetrics will send all conversions to Facebook. So you can enjoy advanced conversion tracking, optimization, and remarketing.